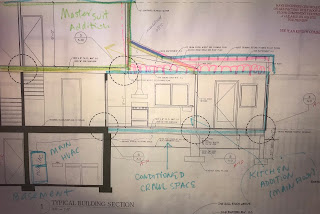
We (the owners) have asked the builder and his mechanical contractor to install heat/AC unit in the addition attic so that would serve both the upper level and the main floor addition. This was required mostly to avoid cold A/C air coming from the kitchen floor registers out of the main unit in the basement.
The attic heat pump unit provides heat for the upper level (master suit) and the kitchen below. Choice of heat pump was unfortunate as the owner has dry eyes syndrome.
In this picture taken from the floor of the master suit, the heat pump supply side is visible.
This picture shows the supply (left) and return (right) shaft for the duct work to exchange air from the attic heat pump and kitchen addition space.
Over the summer of 2018 and then the following winter of 2019 we have discovered that the kitchen addition does not get enough air flow. In the summer it was stuffy, and in the winter there was not enough heat delivered to the kitchen to make the stay comfortable. Heat pump would render useless when the outside temperature falls below 32F. If it were not for the fireplace in the kitchen addition, the winter there would have been miserable for us.
We have also noticed that the upper level bedroom gets a lot of fine dust in a matter of two days which was kind of unusual for the house.
Another HVAC specialist was called in to run freon level diagnostics on the heat pump unit and he did not find any leaks or low levels of freon.
To figure out what is going on, we have asked the architect to run Manual J calculations for the addition. Then we called another local HVAC company to take CFM measurements with the heat pump unit fan running to compare the measurements with Manual J calculations.
The heat pump is 2.5 ton. It produces enough BTUs and CFMs for ~960 sqft of the addition space. The heating BTU load per Manual J calculations is 27,211.
The master suite gets its share of CFMs (261), but the main floor kitchen/mudroom addition get only 29 CFMs (9%) instead of the expected 338 CFMs.
Our finding indicated that
- the upper level master suite of addition gets expected CFMs,
- the main level (kitchen extension and mudroom) gets only 9% of the expected CFM.
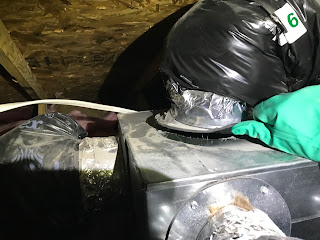
I went to the attic and examined the unit and all of its connectors and found out that on supply side of the unit 3 out of 7 supply connectors are loose and leaking supply air into vented attic space (air loss). This has been going on since the end of the project in May 2018!
On the return side 1 out of 3 connectors has a gap which most likely contributes to the fine dust and another connector is not properly fastened to the connector and detaches periodically.
Here are some shots from my inspection:
This supply connector does not have metal collar on it and is not screwed to the base. It peeled off and loosing air.
The flexible pipe on this connector is loose because the plastic strap fell off. It also looses air.
The connector below is also peeled off in the spot where it is not screwed to the base. It also looses the air.
This flexible duct is bent to the extreme creating an elbow that would make it hard for the air to travel in the most efficient manner.
This is the return connector from the kitchen level. Its collar ring is missing. The connector is not screwed to the base and it peeled off from the base. Most likely this is how the fine dust gets in the unit and spreads across the living conditioned space.
We have reported first the dust issue to the builder back in November 2018 (6 months ago), and although the house addition is still under warranty, we have not had the issue resolved. Considering the fact that the heat loss diminishes the effectiveness of the unit and fine dust poses risk to developing respiratory deceases such as asthma, it is mind boggling why it takes so long for the HVAC specialist to get back and fix it.


